The delivery price is calculated during checkout based on your location and the goods ordered. Our basic delivery prices are:
Delivery within United Kingdom: £12.00 +VAT
Delivery Service: Next working day*
* For products that are in stock and the order received by midday.
Some products go through a final configuration and calibration before being shipped. If the calibration labs are busy this can add up to two days on to the delivery schedule but guarantees a fresh calibration.
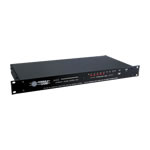
The need for loud music in an entertainment venue can result in "noise" outside, which will not be appreciated by local residents. The most common way to control this noise problem is to install a Music Noise Controller, which will cut the power to the amplifier and related equipment when a preset sound level has been exceeded for a given period of time.
The Sentry usually connects between the electrical supply and the power outlet sockets that are to be used for the audio equipment. It can be used to simply control the signal to the speakers, should you not want to remove power from all the equipment, but the usual requirement is to install it in the mains power circuit, making it difficult to bypass.

The Sentry is simply there to stop the DJ or live band from exceeding the specified limit. In normal use (everybody behaving!) the green lights will indicate the current level and there will be no intervention.
When the sound levels are too high, first the yellow and then the red indicators will show. If this happens briefly then the Sentry will ignore it. If the level is exceeded for 20 seconds (this default period is adjustable from 10 to 70 seconds) then the power to the audio equipment will be cut off and need to be manually reset.
For more details about installing the Sentry and setting up the level please visit the Installation tab.
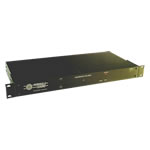
Contactor The Sentry itself is for controlling low voltage systems. To control AC Power (110 to 240 VAC) you also need a Contactor.
External Microphone The Sentry has a microphone built in, but can accept a external microphone for a more flexible monitoring position.
Remote Reset After the Sentry cuts the power you need to press the red button to reset it. A remote reset button can make this more convenient.
For normal use, the Sentry requires direct connection to the mains supply, with the Contactor sitting between the supply and the outlet sockets. This is a simple process but should be carried out by a qualified electrician.
The installation process involves:
Detailed installation instructions are included in the Sentry User Manual, which is supplied with the unit. The information on this page is intended as an overview so that you can see what is involved.
The Sentry music noise controller should be mounted on a solid wall where it can be seen by the DJ or live band, preferably at a height of at least 2.5 m from the floor to discourage tampering. If your layout does not allow for this, a remote display, reset switch and microphone are available to help.
The Sentry unit is fixed to the wall using three screws.
The box has "knock outs" where the mains and signal cables can enter. Rear cable entries are also available to provide a very neat installation.
The Sentry gets its power from the mains supply (120 to 240 VAC). In its normal configuration (controlling power to the audio system), a low voltage signal is then carried to the Contactor. This allows the Sentry to be mounted away from the Contactor without the need to run high voltage cabling.
The Contactor is then connected between the mains supply and the outlet sockets that are available for the audio system.
All wiring should be carried out by a qualified electrician and in accordance with the national regulations.
For more detailed installation instructions and wiring diagrams please visit our Sentry Technical Support web pages.
Once installed, the Sentry needs to be set up to trigger at the right level. This can be done scientifically, using a sound level meter, or it can be set up by ear - when the music can be heard at the boundary, it is too loud.
The Sentry has two trigger levels. For many applications one is adequate, but if you want to be able to easily switch to a different level for any reason then this is possible. An indicator on the front panel shows which threshold is currently selected. A remote key switch and automatic timer are available to select the threshold. See the Options page for more details.
The controls for adjusting the threshold are behind the front cover. The front cover must first be removed and then a screwdriver is used to make the adjustments. This should only need doing once, after the Sentry is first installed.
The Sentry is capable of using the standard "A" or "C" weighting, Linear response or a special Bass weighting. Although most noise measurement is carried out using "A" weighting, for entertainment noise control the Sentry should usually be used on the "C" or Linear setting. The reason is that most music noise problems are in the low frequencies, which are removed by the "A" weighting filter.
The period of time that the sound level is allowed to be over the limit before the power is cut can be set from 10 seconds to 70 seconds. This adjustment is also hidden behind the removable front cover.
The Sentry has provision for a security loop. This can be used to detect when doors or windows are opened, as this would impair the sound proofing of the venue.
Magnetically operated reed switches can be used for this purpose. When connected windows or doors are opened the music is cut.
For most applications the internal microphone is adequate. An external microphone is available as an option. An external microphone is connected via a three-way terminal strip behind the front cover.
The best way to avoid tampering is to mount the Sentry out of reach. However, this is not always possible so security screws can be provided instead of the standard ones for the front panel.
An indicator on the front of the Sentry shows if the microphone as been damaged or tampered with. An optional external mic. tamper indicator is available.
The standard Sentry Music Noise Controller consists of the following items:
As the wiring varies so much with each installation, this must be provided by your electrician as part of the installation service.
The most common option is the Contactor, as this is needed for most Entertainment installations.
| Contactor | This item is needed for installation when the Sentry is to be controlling the power supply (e.g. audio equipment). This is a self-contained unit that connects back to the Sentry over low voltage wiring (12V). The Contactor's main part is a mains relay that can switch up to 32 amps of mains power. |
| External Mic. | If the perfect location for the Sentry is not ideal acoustically you can use and external microphone, usually mounted in a panel wall or ceiling at a more suitable spot. The microphone comes with a 30 m / 100 ft extension cable. |
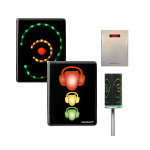
| Remote Display | The remote display is very similar in appearance to the Sentry itself. Connected back to the main unit, it gives the same display of green when the level is acceptable changing to red to indicate that the sound level is too high. |
| Timer | The Sentry has two preset thresholds, so you can set it up to trigger at different sound levels at different times of day. The most convenient way to control this is with the automatic timer. This is a 7-day timer that is built into the main Sentry box. |
| Reset Counter | Some local authorities will want to monitor how often the level is exceeded. The easiest way to do this is to fit a "reset counter", which simply counts the number of times the unit trips and has to be reset. |
The Sentry Music Noise Controller is configured to switch low voltages. If you need to control the mains AC power to the amplifiers (this is often the requirement) then you also need the Contactor - order code SEN-071.
The Contactor can be conveniently mounted close to the fuse box or other suitable connection point.
If you need the Sentry to control high voltage AC power (e.g. 220 VAC) then you need the Contactor too - order code SEN-071.

The Sentry comes with an internal microphone, seen behind the small grill in the image on the right.
Sometimes the most convenient location for mounting the Sentry is not the best place to measure the noise. In this case you can use the SEN-MIC30 Microphone, which comes with a 30 m / 100 ft microphone extension cable.

The microphone is designed to be mounted unobtrusively in a ceiling or wall panel, leaving just the grill showing. This is to ensure that it does not attract attention as shouting into the microphone can cause unwanted power cut-off.

The standard Sentry comes with a built-in microphone. For the optional External Microphone with extension cable, please add item code SEN-MIC30 to your order.
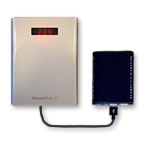
After excessive music noise has caused the Sentry to trigger, you need to press the red button on the front to reset it. An optional remote reset button or key switch can be used to reset the unit from elsewhere in the building.

While the standard Remote Reset Switch is ideal for mounting in a convenient location, the Key Switch version can limit who is able to carry out the reset.
The Remote Reset Button and the Key Switch work in the same way, being wired directly into the Sentry and used to reset it after being triggered by high noise levels.
The button or key switch will usually be mounted lower on the wall, with the Sentry mounted out of reach to avoid tampering or damage. Alternatively the button or key switch could be mounted in a restricted area.
The sequence of events are:
)
Cutting the power to the audio system is not the most elegant or the most popular way to control the noise levels. However, it is the way most often required by the local authority or Environmental Health Officer, as it is a reliable way and difficult to bypass.
If automatic volume control without the cut-off is an option to you then please visit the Automatic Volume Control page, where you will find the AVC2.
If you are in a situation where you need the power cut-off but don't like it, the Sentry with AT-1 Automatic Volume Control is the best option.
A full system with mains power control and automatic volume control consists of the following items:
Other options that are available for the Sentry can be seen on the Options tab.
With the Sentry installed in the usual way (see Installation page), the AT-1 is connected to the audio system between the mixer (or pre-amp) and the amplifier. It is then connected back to the Sentry using a 4-core control cable.
The Sentry measures the sound levels using its microphone. If the limit is reached, it instructs the AT-1 to reduce the volume accordingly.
If the levels continue to be too high (the AT-1 has been bypassed, or a live band is using their own equipment) then the power to the mains sockets will be cut.
This approach satisfies the authorities, cutting power as required, but first tries to avoid ruining the entertainment by simply limiting the volume.
The acoustics of a full venue are different to an empty one. As the Sentry / AT-1 setup is driven by a microphone, this absorption of the sound is automatically taken into account.