The delivery price is calculated during checkout based on your location and the goods ordered. Our basic delivery prices are:
Delivery within United Kingdom: £12.00 +VAT
Delivery Service: Next working day*
* For products that are in stock and the order received by midday.
Some products go through a final configuration and calibration before being shipped. If the calibration labs are busy this can add up to two days on to the delivery schedule but guarantees a fresh calibration.
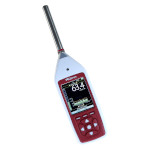
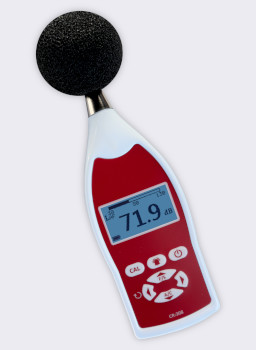
The CR308 is an easy to use sound level meter that meets the international standards to Class 2 / Type 2, as required by many noise measurement standards. It measures the Fast or Slow sound level with both "A" and "C" frequency weightings.
It is essential that a sound level meter meets these standards if it is to be used for any important measurements, particularly those that involve any other legal purposes. The CR308 meets the strict demands of IEC 61672, IEC 60651 and ANSI S1.4 and is provided with a Calibration Certificate at no extra cost, so you can make your noise measurements with confidence.
The CR308 measures the instantaneous sound level with either A or C weighting. Most noise regulations require A weighting. It also has both Fast and Slow time response. Many regulations require Fast but some, like the USA OSHA regulations use Slow as it is easier to average by eye.
The meter also provides the Maximum and Minimum readings for whichever weightings are selected. A Reset button is used to clear and start the next min/max measurement.
An AC output and optional DC output mean this meter can be connected to a level recorder, PC equipped with an A/D converter or integrated with another data logging system.
See Specifications tab for more details about the standards and noise measurement range.
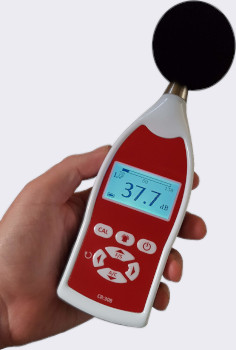
The CR308 is a simple hand-held sound level meter with no data logging and no additional software. As many applications require a single reading to be made, it is often easier to note it down manually that to connect to a computer and download it.
This meter is ideal for making quick sound level checks of machinery noise, office noise and other issues around the workplace. However, please read the following notes about the noise at work regulations.
The standards for fire alarm testing usually demand the measurement of the "A" weighted "Fast" sound level. The CR308 sound level meter provides this measurement.
Although not a data logging meter, the CR308 has an AC output and a DC output, making it ideal for connection to a data logging system via a suitable A/D converter.
The UK and European noise at work regulations and guidelines state that you should use a Class 2 Integrating Sound Level Meter. While the CR308 is a Class 2 meter (so it is accurate enough), it is not an Integrating meter, so it does not provide the average sound level or LAeq as required.
For a full noise at work survey we recommend the use of the CR162B Logging, Integrating Sound Level Meter.
The CR308 is useful as a low cost meter to have in your toolkit for extra checks. The dB(A) measurements will be accurate, it is just the averaging that is missing in a non-integrating meter - you have to do it by eye. However, the full noise at work assessment should be carried out using an integrating meter.
The CR308 sound level meter starts measuring noise levels as soon as it is switched on. The most common measurement is Fast, A weighted sound level, abbreviated to LAF, so this is the default reading.

The bar at the top of the display shows the current sound level and how it fits within the range of the meter. This is most useful when viewing parameters such as Max or Min.

If the regulations require regular calibration checks then you also need the CR514 Calibrator, which is included in the CK308 Noise Measurement Kit. To check the meter's calibration you put the calibrator over the microphone, switch it on and press the Cal button. The meter makes any adjustments automatically.
The CR308 sound level meter can be bought on its own, with a calibrator or as part of a Noise Measurement Kit (meter, calibrator, case). Please check your regulations to see whether you need a Calibrator, or contact us for advice before ordering.
Our noise measurement kits are designed to include all the parts needed, enclosed in a carrying case.
For more information about the calibrator, please visit the CR514 Sound Level Calibrator page.
| Standards | IEC 61672-1:2013 Class 2 |
| ANSI S1.4 and IEC 60651 Type 2 | |
| Range | 30 dB (A) to 130 dB (A) |
| 40 dB (C) to 130 dB (C) | |
| Frequency weighting | A and C |
| Time weighting | Fast (F) and Slow (S) |
| Display functions | Sound level, maximum, minimum, C peak |
| Measurements | LAF, LAS, LCF, LCS, LCpk |
| Noise floor | < 25 dB (A)and 35 dB (C) |
| Resolution | 0.1 dB |
| Display flags | Alarm limit, overload, under-range |
| Auto cal. range | ±4.5dB |
| Reference point | 94dB (1kHz), 92.9dB (8kHz) |
| Settling time | 60s |
| Display | Backlit 128×64 LCD, resolution 0.1 dB |
| Electrical inputs | 5V power in via mini USB |
| Power | 2 x AA/LR6 1.5V batteries |
| Or 5V DC via Mini USB | |
| Battery life | 24 hours |
| Microphone | 1⁄2” pre-polarised electret condenser type HY:205 |
| Operating temperature | 0°C to +40°C |
| Operating humidity | 25% to 90% |
| Atmospheric pressure | 65 kPa to 108kPa |
| Storage temperature | -20°C to +60°C |
| Dimensions | 215 × 68 × 32 mm |
| Weight | 220 g (including battery) |
| Electrical outputs | AC (Tip 3.5 mm jack) and DC (middle 3.5 mm jack) |
| DC output | voltage 15mV/dB, range 450mV to 1950mV |
| AC output | RMS 2V |
| Tripod Mount | 1/4" Whitworth socket |